Tadasana

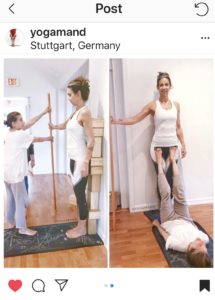
Mountain Pose is my favorite pose this month. One of my favorite Instagram inspirations, @yogamand, regularly does poses that defy my eyes, and she happily explains how to do them. This month however, she posted a lovely Tadasana partner assist that illustrated beautifully how to set the tops of the thighs back. In doing so, the pelvis moves into a slight anterior tilt. This is the position the pelvis falls in while the body is held in what is called “anatomical neutral”. When then torso is stacked over the pelvis and thigh bones, as one of my students put it, “I feel weightless!”

If you want to achieve this feeling for yourself I recommend standing with a slight anterior tilt to the pelvis and taking a slow big inhale, lifting the ribcage away from the hips. A feeling of gentle stretch may happen in the belly and lower spine. Keep the body in this uplifted position even with the exhale and maintain.

Meditation

Meditation is a goal for many of us, but the actual doing of it…

A saying I live by is “One minute is better than no minutes.” Meditation is a practice, most importantly.  Practicing something means you do it over and over again and see it improve over time. Meditation itself often feels like it’s being done wrong.  I can’t tell you how many times I’ve heard “I can’t meditate.  Every time I do it I keep getting distracted.  I can’t focus.” This is a very normal experience to have during meditation.  Meditation is the PRACTICE of focusing the mind.  Each time it wanders, we practice leading it back into the present moment.

Physical positions to adopt while meditating vary.  Some choose simple seated position, one foot in front of the other.  A meditation cushion can give a little lift to the pelvis to make the seat more comfortable.  For those who find this uncomfortable, simply sitting on a chair can work.  In order to keep the spine erect, sitting on a balance ball is a great option.  Using the spine and core to keep an upright posture not only develops strong muscles, but also helps keep the mind focused while meditating.  From personal experience I have found that lying down, while tempting, is a fast route to falling asleep instead of meditating.

Try one minute.  Focus on your breath. Try to make the inhales as long as the exhales. Begin with one minute. Try it once a day for a week, first thing in the morning when you wake up. Commit to presence.  See how it goes. You never know.

Krounchasana

Krounchasana is typically done with the bottom leg in virasana, but can be done with other foundations as well, including janu sirsasana leg.

In krounchasana, I feel that the most important alignment cue to observe is that of an uplifted spine, with the muscles of the lower back and abdomen engaged to maintain a strong foundation in the pose, both for energetic as well as safety purposes.

Some of us are gifted in the hamstring flexibility department.  Some of us are less so.  This pose can be a challenge to the ego in that the rush to straighten the leg can compromise the spine, even to the point of injury.  I recommend working with the knee bent as much as necessary to preserve a strong uplifted spine.  Have patience as your hamstrings open.  Connect with the feeling of your breath as you hold the pose.

Begin with one leg in virasana, inner edge of foot drawn in toward the outer hip, toes flared. Hold the opposite foot and bend your knee to pull the knee back alongside your torso. Elongate your spine, drawing your shoulders back and lifting the crown of your head upward.  Pay special attention to the orientation of your pelvis, attempting to keep it neutral, meaning that the front and back of your pelvis are equidistant to the floor.  The tendency will be to rock backward in the pelvis so that your front hip bones are further away from the floor than the top of your sacrum.

_JTB1726-L

Keeping this alignment in your spine, pull back with your hands as you push your foot into your hands, attempting to straighten the leg.  However, do this mindfully, as sometimes there will be a tendency to “pop” the leg straight, putting strain on the posterior knee and hamstring attachments.  If the leg straightens, work it toward vertical and pull your forehead to your shin.

Hold the pose for 5-10 breaths, and repeat on the other side.

_JTB1732-L

Urdhva Prasarita Eka Padasana

Also known as standing splits, the trick in this pose is to work with pushing your feet away from one another rather than trying to lift the back leg.  To warm up for this pose, do several hip, thigh and hamstring stretches.

Example:

Uttanasana

Janu sirsasana

Eka Pada Bhekasana

Danurasana

Pigeon prep

Pigeon Prep with back thigh stretch

Practice this pose against a wall.  Face away from the wall several feet in distance from it.  Place your hands on the floor, bending your knees if necessary.  Reach one foot up the wall, crawling your toes up bit by bit.  Push your feet away from one another as you push your hands into the ground, working your pelvis back toward the wall.

For the free standing pose, you can enter from Virabhadrasana 3, Ardha Chandrasana, or simply from forward fold (uttanasana).  With fingertips on the floor, lift one foot up and bend both knees.  Then push both feet away from each other, reaching the lifted foot toward the ceiling.  Continually turn the inner thigh of the lifted leg inward and toward the back of the body to keep the hips square.  Work toward bringing the front of the body to touch the thigh of the standing leg.  Eventually you can bring one and then both hands to the ankle of the standing leg.

standing split

Upcoming workshop!

Come play with Tanya and Jaimie in taking your practice to the next level.  Deepen your backbends, turn your world upside down, and fly in arm balances.  Come play.  You won’t regret it.

Yoga 202!!!


Eka Pada Galavasana

Named for the sage Galava, this pose is usually referred to in English as flying pigeon pose, which makes sense if you look at the position of the top leg and notice as well that the rest of you is… not on the floor.

In the book of Tanya, there are three important keys to getting this pose: bent arms, getting the foot and knee as deeply into the armpits as you can, and pressing the shin of the top leg away from you.  If you struggle with hip mobility, this pose may be a little down the road for you, but doing all the preparatory work for the pose is the way to eventually get into it.  If you are a person with excess hip mobility, your challenge will be to balance the external hip rotation that is easily come by with intentional opposing internal rotation to keep the muscles around the join active.  This will not only give your pose buoyancy and dynamic energy, it will strengthen the muscles around the hip joint and protect it from long term wear and tear.

To open your hip joint ahead of time, try runners’ stretch, hanumanasana (if it’s available to you, or whatever variation you are working on), seated or standing baby cradle, pigeon prep, and might as well throw a bhakasana or two in there to get used to the feeling of being in the air.  The work of pulling the belly in and up and inflating through the back of the ribcage is helpful for EPG as well.

Once you’ve prepped for the pose, begin by standing in hangman pose with one ankle resting on the opposite knee, creating a figure 4 shape with your legs. Squeeze your inner thighs in toward each other, flex the little toe side of the raised foot toward the outside of the knee (protecting your knee joint, just as you do in Pigeon Prep) and bend forward, bringing your fingers to floor as you bend your standing knee. 

If you wish, this is a fun opportunity to practice toe stand, a la Bikram. 

Whether you do toe stand or not, get yourself back into the previous pose, fingers to floor, and tuck your shin as deeply up into your armpits as you can, and flex your toes strongly so you wrap your toes around the outside of your upper arm. BEND YOUR ELBOWS, as though you were doing a pushup, or Chatturanga Dandasana. Tilt your weight forward, head moving floor-ward. PRESS YOUR SHIN DOWN into the shelf you have created for it by bending your elbows. With your weight forward in the direction of your head, lift your back foot up off of the floor and play with just balancing on your hands.  

KEEP PUSHING your shin down into the back of your arms.  Reach through the sole of your top foot, straightening your leg. Fill and open your ribcage, becoming buoyant in the same way you do in Bhakasana.  To challenge yourself, rather than lifting your hips high away from the floor, try to keep your hips closer to the level of your shoulders.  Pull your hands toward your feet, protecting and strengthening your shoulder joints. 

For more in-depth discussion and background into Eka Pada Galavasana, please visit the following link: http://www.yogitimes.com/article/eka-pada-galavasana-flying-crow-pose/

Enjoy!!


Upper back opener

Many times before a class, you can assist your upcoming practice by opening parts of your body that can get a little stubborn.  For many of us the upper back is disinclined toward bending, whereas the lower back will bend in all sorts of directions, occasionally to our detriment.  A simple gravity-assisted upper back stretch can be useful to get the muscles open and encouraged in the backbending direction.

To do this stretch, place a yoga block or rolled-up blanket on your mat width-wise and lie face-up on it with the block or blanket just underneath the bottom tips of your shoulder blades.  If you were to draw a line around to your back from the point where your ribs meet in front, just below your sternum, this is the spot you should feel the bend.  You may wish to start with the block on its lowest setting;  the medium setting is pictured here.


Allow your hips to sink down to the floor and pull your abdominal muscles in so that the lower back doesn’t resort to taking the brunt of the stretch. You should feel the backs of your legs all the way into your gluteal muscles resting on the floor.  To begin with they may not rest comfortably.  Use your breath to sink the backs of your legs into the floor.

Use a blanket if needed on which to rest the back of your head.  Rather than tilting your chin up toward the ceiling, see if you can tuck your chin slightly to keep the back of your neck long.  Eventually as you sink into this stretch, you can remove the blanket and rest the back of your head onto the floor.  As this stretch becomes easier for you over time, you can replace the blanket with a block, and change the settings on the block, taking it even to the highest setting.  This way your back becomes accustomed to bending in the upper area while keeping the lower part of the back long and supported.


One of the primary benefits of this work is that while you put yourself in the position of a backbend and feel some of the emotional and physical concerns that come up in that position, you can use your breath, your single-pointed focus, and the softening assistance of gravity to prepare you to do the same once you are in more active poses.


Anjaneyasana

AnjaneyasanaAnjaneyasana may look simple from the outside, but is a combination of balance, thigh stretch and backbend all in one. To get the maximum benefit from this pose, the practitioner should focus on all three aspects of it.

Anjaneyasana

Initially the hip and abdomen will be closely connected.

  1. From standing, step back to a high lunge, fingertips to the floor. Lower your back knee to the floor. For your own comfort you may need cushioning under your knee. However, from a deep enough lunge, the part of your knee that will be touching the floor should be above the patella (knee cap). This area has more padding as it is not directly on the bone. Flare your toes on the back foot and press the top of the foot into the floor. This will ground you and help you balance. Squeeze your inner thighs in toward the center line of your body, from the sides. This will also help your balance.
  2. Take both hands to the top of your front knee.
    Anjaneyasana

    Push into the knee to bring torso to upright and pull belly muscles in to create space between hip joint and abdomen.

    Press downward to bring length into your torso as you inhale. On the exhale, draw the muscles of your abdomen in, moving your belly away from your front thigh. With your abdominal muscles, pull your pubic bone up toward your sternum (chest bone). This action is similar to looking down at your zipper as you tilt it upward to zip up your pants.
  3. Maintaining all of this, draw your shoulder blades (scapulae) together onto your back, focusing your attention particularly on their bottom points. The shoulder blades are shaped like upside-down triangle.
  4. Take your hands off your knee and allow your arms to come along your sides, palms turned outward.
  5. Anjaneyasana

    If the hip continues to hike up toward the shoulder, use the same side hand to turn hip down toward the floor.

  6. Keeping the strength in your upper back, abdomen and thighs, raise your arms alongside your head, palms facing each other. With each breath, sink deeper in the front thigh, keep your abdomen strong and pulling away from the thigh, and tilt your chest upward, gazing up.
  7. Remain in this posture for several breaths, then release carefully, with awareness.

Learn about the mythology behind this pose and its symbolism… {Read More.